Showing posts with label design it yourself clothes patternmaking simplified. Show all posts

Thursday, December 12, 2013

December's AGAM


I'm mostly done with November's garment and it has been for a while but I have not been in the my little studio for a while so I'll just post it with December's garment.

For December I plan to continue my self drafted pattern route and this time its one of my projects from Design-It Yourself Clothes.


The Betsy Jacket

Sunday, August 18, 2013

Basic T-Shirt Variation 2: Charlotte Top aka The Sack


Here is the second variation of the basic t-shirt called the Charlotte top. This was one project I was trying to get around and make it work another way. I don't mind as a matter of fact I want a basic pattern for a slouchy or loose fitting tunic t-shirt but what gives is the drawstring at the neckline on this one, it just makes look like a sack literally and I' not feeling it.

It maybe partly my fault how much of a sack it is. In the directions for changing the pattern Cal suggest adding 1 inch to center front and center back but I added 2, I really wanted a full tunic tee and it came out full but then again it it maybe that drawstring neckline. For the sleeves I did not shorten them as much as the book calls for but instead shortened my sleeves from 3/4 length to just below elbow. I still added fullness to the sleeve but I did not gather it by adding elastic instead I just left it loose.


Temp drawstring
I did not have anything I wanted to use for the drawstring and I did not like the look of my self fabric ties so I just used some trim I found in my sewing room for a temporary substitute .

My fabric collection was already pretty small and this lesson on t-shirts has left my knit collection pretty thin so I don't think I'l be doing too many more tees so I'll be moving on to woven tops soon.

Quick Info:

  • Self drafted t-shirt pattern using Design-It-Yourself Clothes
  • 4 pattern pieces (front, back, sleeve and drawstring casing)
  • Polyester knit 
  • Seams sewn with a straight stretch stitch
  • Hems are turned once and sewn with a honeycomb stretch stitch
Until next time, happy sewing


Thursday, May 23, 2013

Design-It-Yourself Clothes Basic T


First Muslin


A couple of months ago I blogged about wanting to return to patternmaking and I am so glad I did. I'm just enjoying it. I have already drafted the basic skirt again. But this time I started with a sloper draft from Building Patterns and then mixed in DIY Clothes draft to make my basic skirt pattern that fits me a little better. I have already made two muslins and have my final working pattern that I'm pleased with. I'm currently working on my first skirt and hope to be done soon.

Next up was the basic t-shirt pattern, this took a little bit more time to get the results that I'm looking for and its still not quite there but I am going to keep working on it. After drafting the pattern with my measurements using the instructions, I sewed up muslin number 1 the pink black and off white knit. It was quite clear that I over measured on some things. The shoulder length was way too long, the neckline was too high for me and the sleeves and shirt length too long also.


Second Muslin
Muslin number 2: Sleeves still just a tad too long, shoulder length still too and neckline is just right but I forgot to take off the neckline length when making the neckband so the band was the same length and made the neckline stand way from my body.


Third Muslin


 Muslin number 3: Almost there but still not quite. I'm still not happy with the shoulder or sleeve I'll continue to work on that. I'm thinking about adding a center back seam for a better fit. For the most part the length of the sleeves and body are right where I want it.

Muslin number four is going to have a wait a couple of weeks since I want to finish the basic skirt and complete my level 2 garment for YCMI. A post on those coming soon.


Until next time, happy sewing

Thursday, March 14, 2013

Returning To DIY Patternmaking

As much as I love sewing, I also love making my own patterns, there is just something satisfying and gratifying  about creating something from scratch that is exactly what you want and fits perfectly. I have only made a few successful patterns, but I want to keep trying. I know that patternmaking is a skill that is not learned overnight and even the best patterns still need fitting sometimes.

I'm going to once again try to make everything in the book ,BUT with my own taste in mind. So they might not be exact copies. I plan to start with the skirt. Even though I have my own skirt pattern that I drafted from this book, I want it to have a looser fit this time. I want a wardrobe of flowy maxi skirts for the summer with simple tees. Getting the fabric for the skirts I think will be easy, the hard part is finding some good knits. Also I want some cardigans also. It does get very hot here but most of the time your indoors somewhere and talk about the AC kicking. It will on something like 20 degrees F. So after my shirt I think I'm going to work on getting a good basic t-shirt, cardi and maxi skirt, because summer is already here.


Are you seeing the pink skirt trend here?

All pics courtesy of pinterest.com
Until next time, happy sewing...

Sunday, September 30, 2012

Denim Skirt From Self Drafted Pattern


This is my four gored skirt from my self drafted skirt pattern from Design It Yourself Clothes, it is basically the Roise without the side patch pockets and with a center back seam. For the center front and center back seam are mock flat felled seam. For the waistband I really need to make a waistband pattern piece, I have facing pieces drafted but sometimes I like the look of a waistband and this is the second skirt I have made from this pattern with a waistband. Just using the instructions for the waistband I just get my numbers and just chalk draw it on to the fabric using the salvage as one side to use it as a finishing treatment on the inside. The fabric is a stretch denim that I got from fabric.com late last year. I still have a few yards leftover so I hope to make at least two more items from the rest. Other than that there really isn't more to this skirt. I did run into a problem just at the end of making it, just as I am making good timing on finishing it, just as I was trying on for my last try on before hemming the zipper breaks , you could call that moment a Florida Evans moment you can see in my last two pics. So that cost me an extra sewing session but is now fixed. .


PR review:

Pattern Description: This is the second variation on the basic A-line skirt. Mines is four gores with side center zip and waistband with button closing.

Pattern Sizing: Based on your own personal measurments

Did it look like the photo/drawing on the pattern envelope once you were done sewing with it? No mines is much longer and I did not add the patch pockets

Were the instructions easy to follow? I have made enough skirts that I don't need instructions, well just to find a good way to insert a center zipper.

What did you particularly like or dislike about the pattern? none

Fabric Used: very stretchy denim from fabric dot com

Pattern alterations or any design changes you made: no its all your own design

Would you sew it again? Would you recommend it to others? yes and yes

Conclusion: Skirt that fits you, and designed by you. A great way to build your skills and wardrobe


Until next time, happy sewing...

Thursday, March 01, 2012

Skirts

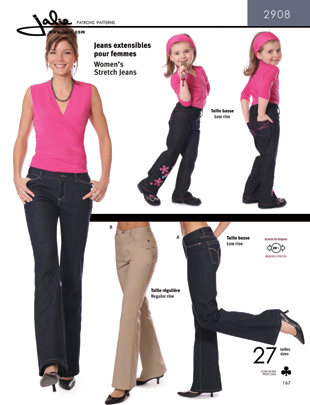
So my first items to sew  for March will be skirts. I have been wanting a jeans style skirt for a while but it seems like the last time anyone made a jeans skirt pattern was during the 70's, 80's and early 90's. I was surprised I was not able to find any recent ones since jean skirts are still worn by a lot of people still. The closest and most recent I could find was Simplicity 3754. So I'll be using Simplicity 3754, Jalie 2908,  and Design It Yourself Clothes to help me turn my TnT skirt pattern into a jeans skirt pattern. I plan to use the pattern for both skirts but one will be a-line and the other more pencil or straight with a back vent.

I don't plan to trace from one pattern onto another but instead, draft it myself using these patterns as guides and my book(s) when I can't figure things out on my own. The only thing I'm still trying as far as the pattern is if I want back pockets or not. 
So tonight I'll be doing pattern work and maybe tomorrow also, I'll try to take pics as I go along but I can't promise, I can sometimes get so wrapped up in what I'm doing I forget about everything else. I'm hoping to be ready for a muslin by Saturday and no later than Sunday, we'll see.

Until next time happy sewing...

Sunday, February 26, 2012

My First Real TNT Pattern

My first real TNT pattern, my self drafted skirt pattern. I have it up a total of 5 times already if you include the muslin and I have may more plans for the future. As a matter of fact for March I have two more planned. In the ten years that I have been sewing I have never made a pattern up that many times, the only one to come close is Simplicity 2725 and is because of the contest and that was 4 times if you include the muslin. But they are not as successful as my skirt pattern because they don't flatter me so I don't wear them at all. But my skirts are my favorite. I drafted this pattern I think around Nov 2010 but I was not able to do much with it since I was pregnant. So I was only able to make the blue paisley cord and purple before I got too big and I was already pregnant when I made it. Also so far they are the only two that were made as a straight A-line skirt. Next up was my black and white anthro inspired skirt which I made this past fall and now my red four gore skirt.
Getting to this point has been a process for me. I had been looking for a maxi skirt pattern for awhile but most patterns just weren't the simple A-line pattern I wanted and when I did find one it just wasn't long enough or full enough for me. So before I came to my final draft I drafted this pattern at least three times before. Once I had a draft I was pleased with it still took me a while to use it since I had no directions to make it up, I just kept feeling like it was not right or something. But once I had made it up twice and had worked out the sewing order and construction, I love it. Once I wore the purple plaid and DH asked me if I had made it, it wasn't that it looked badly sewn, but he remarked at how well it fit me as if it was made for me. I didn't tell him that I had drafted the pattern myself.

So far the red sateen and blue paisley cord are my favorite versions of this pattern, but sadly some kind of way my blue paisley got a whole in it so I only wear it around the house. I'm hoping to make two more next month, but not sure how or if I'll change it up some more time will tell.

Sidenote: I drafted my pattern using Design it Yourself Clothes Patternmaking Simplified

Until next time happy sewing...

Sunday, August 07, 2011

Taking my time with it

So here is where I am at with my skirt, I haven't even started on the top yet. But I hope to at least finish the skirt today and cut out my today also.
For my skirt I need to insert my zipper, apply interfacing to the skirt facing and attach those and hem. Not much by the looks of it but I know this will probably be an all day task for me. The kids just seem to go haywire when I'm in my room during the day for some reason. At the most I may get 10 or 15 mins of no interruption. So keeping to Nancy's 10,20,30 Minutes to Sew is a must for me to be able to complete anything. Also I have to learn to stick to one thing at a time, even though I'm not exactly doing that right now. But the top and the skirt are one project for me right now so I'm letting that rule slide for now.

Until next time happy sewing......


Saturday, November 20, 2010

Design it Yourself skirt- tools

Pretty straight forward, these are the tools I used when making the pattern.
  1. Paper- long enough and wide enough to draft one quater of your skirt, remember you need a front and back so two sheets is what you'll need.
  2. Paper cutting sissors- I keep a pair for paper and a few pair for fabric that I keep out of reach of  everyone in this house.
  3. Mechanical pencil- now I have read forum threads and books which say you need to use this kind of pencil and  some that say you don't, there are many arguments to both sides about but for me I just like the constant even line and no sharping is needed, that's enough for me.
  4. A square- this is for squaring various angles that will me made during the draft a regular 2 inch wide ruler will do tho or a triangle with a 90 degree angle. (this is not in the picture but I do have a  professional one)
  5. Do hicky measuring thing- okay that is not its name but its the little blue thing in the middle of my picture it helps me to add seam allowances or mark them with ease but again a regular 18x2 inch ruler will do.
  6. Hip curve- this is for smoothing out those angles that are formed when drafting your skirt
  7. Tape measure- for taking your own measurements, for me I don't use it to aid in drafting as it is too floppy so it doesn't stay still enough for me, but I do use it to measure curved areas.
  8. Skirt drafting directions- pretty much self explanatory. For those who do not have the book here is a good online source.
next post fabric and completed pattern

Saturday, February 20, 2010

Design It Yourself -A-line skirt part 1

For my first skirt  I'm going to be using a twill piece that brought with me. I'm not going to line the inside but instead use the lining fabric to finish the seams. I'm still looking for a serger ,so I'll have to find other ways to finish the inside.


beige twill, lining, zipper

Now starting off this is my second time getting ready to draftdrafting it, the first time it was too loose in the waist and too tight in the thigh area. So instead of messing around with the pattern I just decided to redraft it especially since want to start my plans from the beginning I wanted a refresher on drafting skirts.

rough pattern complete
First rule when teaching yourself from a book. Read EVERYTHING
at first I just skimmed over it and  just as I was about to smooth out the angles I remembered I had forgot to add wearing ease, oops.
smoothing out waistline
Other than that I was able draft from start to finish in less than an hour, it can be done in less than an half hour if you have everything ready before you go, for me I had to keep getting up and searching for this and that.
seams added
front and back complete
Tonight I plan to sew up the muslin and tweak the fit. We'll see how it goes.


LinkWithin

Related Posts with Thumbnails